How to Create Long Shots in AI Anime
The prompting structure that places your character fully inside a world — and why most long shot attempts drift into medium shots or get swallowed by the environment.
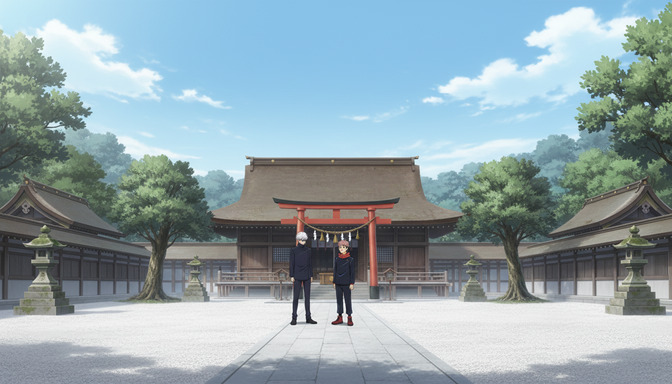
The long shot is the workhorse frame of anime storytelling. It shows the character from head to toe, places them fully inside an environment, and lets the space around them do narrative work. The shrine courtyard. The ruined city block. The school entrance lined with cherry trees in bloom. These frames tell you where a story takes place and what kind of world the characters inhabit before a single line of dialogue has been delivered.
Most AI anime prompts that attempt a long shot fail in one of two directions. Either the model defaults to a medium shot, cropping the character at the waist because that's the assumed framing when you describe a person, or the environment expands to swallow the character entirely, producing something closer to an extreme long shot where the character is a small shape in the distance rather than a clear subject inside a legible world. The five steps below address both failure modes with prompting structure that keeps the character fully visible and the environment genuinely present as a co-subject.
👉 Try AutoWeeb and Generate Cinematic AI Anime Long Shots with Prompt AnalysisStep 1: Name the shot type in the first three words of the prompt.
AI anime models respond to cinematographic terminology. "Long shot," "LS," and "full shot" all activate a framing register where the character is visible from head to toe and the environment occupies a meaningful portion of the frame. Without this instruction at the start of the prompt, the model defaults to the most statistically common framing for a described character, which is almost always a medium shot from the waist up.
The shot type instruction needs to be first, not buried in the middle of a character description. A prompt that opens with a character's hair color and clothing before mentioning "long shot" at the end will still produce a medium shot more often than not. The model reads the opening phrase as the compositional instruction.
Opening without shot type: a silver-haired boy in a dark school uniform standing in front of a traditional shrine, a red torii gate visible behind him, stone lanterns on either side of the path.
Opening with shot type: long shot of a silver-haired boy in a dark school uniform standing in a traditional shrine courtyard, his full figure visible from head to shoe, a red torii gate centered behind him, stone lanterns flanking the gravel path on both sides.
The second prompt gives the model a compositional target before it decides anything about character detail or environment density. It knows where to put the camera before it begins building the frame.
Step 2: Lock the character's full body in the frame explicitly.
The defining visual commitment of a long shot is that the character is visible from head to toe. This sounds obvious, but the model needs explicit confirmation that both ends of the body are in frame. A prompt that describes the character's face, hair, and clothing in detail without specifying that their feet are visible will often produce a medium shot, because the description's weight is concentrated on the upper body.
The simplest fix is a direct statement of what's in frame: "full figure visible from head to foot," "the character's entire body visible including their feet," or "framed from the top of their head to the ground." Pair this with a height-to-frame ratio to give the model a concrete target. A character occupying roughly half the frame height reads as a long shot. A character at one-quarter frame height starts to approach an extreme long shot territory. A character at three-quarters frame height is too close and will read as a medium-wide shot.
Full-figure instruction example: long shot, the white-haired detective's full figure visible from the top of his coat collar to the soles of his shoes, occupying roughly half the frame height, standing at the entrance to a narrow rain-wet alley, the alley walls and overhead fire escapes framing the scene on both sides.
Group shot with full figures: long shot of two anime characters standing side by side at the entrance to a shrine courtyard, both figures fully visible from head to foot, occupying the center third of the frame, the shrine's main hall filling the upper background and the gravel path extending from their feet toward the camera in the lower foreground.
Step 3: Build the environment as a co-subject, not a backdrop.
A long shot is not a portrait with a background image behind it. The environment and the character share the frame's narrative weight: the character tells you who the story is about, and the environment tells you what kind of world they inhabit. A silver-haired boy standing in front of a shrine becomes a different scene entirely when the shrine is a ruined shell versus a maintained and sacred space. The same figure, the same framing, completely different story register.
Build the environment by describing at least three spatial elements: something at the character's level (what they're standing on or next to), something behind them (the immediate background), and something in the upper third of the frame (sky, roofline, tree canopy, or architectural height). These three layers give the model a complete vertical cross-section of the world rather than just a backdrop.
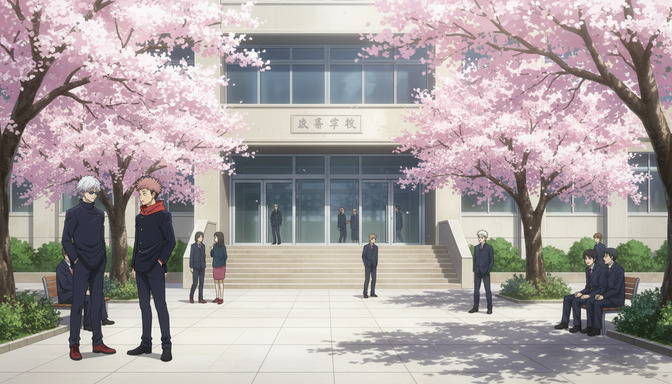
Three-layer environment example: long shot of a girl in a red scarf standing on the gravel approach to a cherry blossom-lined school entrance, her full figure centered in the frame, falling petals at her feet and along the path, the school's stone facade and entry stairs filling the middle ground behind her, the upper branches of the sakura trees framing the top of the shot with a pale sky visible between them.
For scenes where the environment communicates mood or history, name what the setting implies. A shrine courtyard that is "swept clean and maintained, stone lanterns uncracked, the main hall's paint intact" implies a very different narrative situation than one that is "overgrown, the lanterns tilted, fallen leaves uncollected across the gravel." The model reads these as tonal instructions, not just visual details.
Step 4: Use negative space to give the shot breathing room.
The long shot's power comes partly from what isn't crowded against the character. A frame jammed with detail at every edge looks busy; a frame where the character has open space around them reads as composed and intentional. Negative space is not empty space. It's the air around the character that lets the viewer's eye settle on them before taking in the surrounding world.
Negative space in a long shot takes a few practical forms: open sky above the character, an expanse of ground or water below them, empty pavement or courtyard stretching away in the foreground, or a deliberately minimal background like a plain wall or uncluttered horizon. The character doesn't need to be centered to have breathing room, but they need at least one open edge, where nothing competes for attention, so the framing reads as deliberate rather than coincidental.
Open sky above: long shot of a white-haired swordsman standing at the edge of a cliff, his full figure visible against an open overcast sky that fills the upper half of the frame, the cliff's rocky edge at his feet and the valley below visible at the lower corners, nothing competing with his silhouette in the sky portion of the frame.
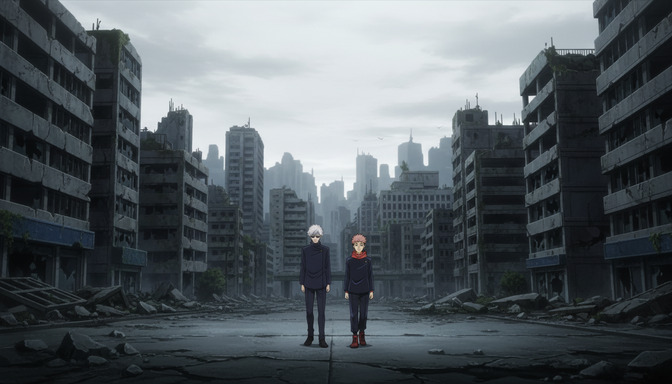
Open ground below: long shot of two figures standing in the center of a destroyed boulevard, the collapsed buildings rising symmetrically on either side, an open stretch of cracked pavement extending from their feet toward the camera, the empty middle distance between them and the camera giving the scene its weight rather than filling it with debris.
Centering negative space around a group: long shot of three students near the school entrance, the cherry blossom trees framing both outer edges of the frame, the figures clustered slightly left of center, open sky and the school's second-floor windows visible to their right, the space to the right of the group deliberately uncrowded.
Step 5: Use AutoWeeb's prompt analysis to verify the framing before you generate.
Long shot prompts fail in the same predictable ways: the shot type isn't stated so the model defaults to medium framing, the character's full body isn't anchored in the frame so the feet get cut off, or the environment is described as background rather than built as a spatial world with actual depth. These are structural gaps, and they produce the same output across multiple generation attempts because the underlying prompt instruction is missing. AutoWeeb's prompt analysis identifies these gaps before generation so you can fix the prompt instead of regenerating the same cropped frame four times.
The analysis evaluates a long shot prompt for three things: whether the shot type is named and placed early enough to govern framing, whether the character's full body is anchored in the frame with explicit instruction, and whether the environment has enough spatial detail to occupy a long shot's field of view as a genuine co-subject. For group scenes, it also checks whether the framing instruction accounts for the full group rather than just one figure, since multi-character prompts often produce a long shot on one character and a medium shot on the others.
A practical example: take a prompt like two anime characters at a shrine, traditional Japanese architecture, dramatic atmosphere. AutoWeeb's prompt analysis will flag the missing shot type instruction, the missing full-body anchor ("visible from head to foot"), and the environment description that names mood without building spatial layers. Each flagged item comes with a clear reason: the model needs these instructions to produce the frame you're imagining. Without them, it fills the gaps with defaults.
After addressing the gaps, the prompt becomes something like: long shot of two anime characters standing in a traditional shrine courtyard, both figures fully visible from head to foot in the center of the frame, a red torii gate centered behind them, the main hall and its wide overhanging roof filling the upper background, stone lanterns flanking the gravel path, open sky above the hall's roofline, the path extending from their feet toward the camera in the lower third of the frame. The analysis doesn't write the prompt for you. It maps where the instruction is ambiguous and where the model is being left to guess.
For video prompts in Seedance 2, the analysis adds a motion check for long shots: does the described camera movement keep the character fully in frame across the clip's duration? A slow push-in that works at the start of a clip can crop the character's feet or head by the end if the framing isn't specified to maintain a fixed body proportion. The analysis flags when a movement instruction creates a framing conflict with the full-body requirement so you can add a constraint, like "maintaining the character's full figure in frame throughout," before generating.
👉 Start Creating AI Anime Long Shots on AutoWeebFrequently asked questions about long shots in AI anime.
What is the difference between a long shot and a medium shot in AI anime prompting?
A medium shot frames the character from roughly the waist up. A long shot frames the character from head to foot, with enough space around them that the surrounding environment is also a visible part of the frame. In prompting terms, the practical difference is that "medium shot" is the model's default when you describe a character without a shot type instruction, while "long shot" or "full shot" shifts the framing back and keeps the full figure in view. If your outputs consistently crop the character at the thighs or waist, the model is defaulting to medium framing. Adding "long shot" to the opening of the prompt, along with an explicit statement that the character is "visible from head to foot," corrects this.
What is the difference between a long shot and an extreme long shot in AI anime?
A long shot keeps the character as a clear, identifiable subject within the frame. Their full body is visible, their clothing and silhouette are readable, and the environment surrounds them without overwhelming them. An extreme long shot places the camera far enough away that the character becomes a small shape inside the environment, often visible as a silhouette rather than a face, with the world taking primary visual weight. In practice, the threshold is roughly whether you can read the character's clothing details. Long shot: yes. Extreme long shot: no. For the prompting structure behind extreme long shots, the extreme long shot guide covers that shot type with its own five-step breakdown.
Why does my long shot keep coming out as a medium shot?
The most common cause is that the shot type isn't stated in the opening phrase of the prompt. AI anime models default to medium framing when given a character description without a camera instruction, because medium shots are statistically the most common output in their training data. The fix is two parts: name the shot type first ("long shot of...") and add a full-body anchor statement somewhere in the opening sentence ("his full figure visible from head to foot" or "both characters visible from head to shoe"). The shot type tells the model where to put the camera. The full-body anchor confirms what needs to be in frame. Either instruction alone is less reliable than both together.
Can I use long shots in AI anime video prompts?
Yes. Long shots in video work well as establishing sequences at the start of a scene, or as emotional landing frames where the camera holds on the character inside their environment after an event. For video, the framing instruction needs to include a statement that the full figure remains in frame throughout the clip, especially if you're adding camera movement. A slow push-in toward a character works for a long shot opening, but if the instruction doesn't specify "maintaining the character's full figure in frame," the push-in will often end in a medium shot by the clip's final frame. Include the constraint explicitly: "long shot, slow push-in, character's full body remaining visible from head to foot throughout."
How do I keep a specific character recognizable at long shot distance?
At long shot distance, the character's face is visible but not dominant, so recognizability comes from silhouette, hair color and style, and distinctive clothing. A character in a bright red scarf, a long dark coat, or strongly colored hair stays identifiable in a long shot through those visual markers more than through facial features. Include these traits explicitly in the prompt. If you're working from a saved character in AutoWeeb, the character's visual details carry into the scene automatically, so your prompt can focus on the scene's spatial structure rather than re-describing the character's appearance from scratch.
What environments work best for long shots in AI anime?
Environments with clear architectural or natural framing work best, because they give the model logical boundaries for the shot. Traditional Japanese settings like shrines, schools, and city streets have strong vertical and horizontal geometry that the model frames naturally. Post-apocalyptic environments work well when the ruins have height variation that provides spatial depth on both sides of the character. Open natural environments like cliff edges, beaches, or open plains work when paired with a strong sky element that fills the upper frame. The environments that fail in long shots are ones without spatial anchors: a uniform fog, a featureless interior, or an environment described only by its mood rather than its physical structure. Give the model something to frame the character against on at least two sides.
How does AutoWeeb's prompt analysis help specifically with long shot prompts?
AutoWeeb's prompt analysis breaks down the framing structure of your prompt and checks for the elements the model needs to produce a stable long shot. For long shots specifically, it checks whether the shot type is named early enough to govern the framing, whether the character's full body is explicitly anchored in the frame, whether the environment is described with enough spatial layers to occupy the wider field of view, and whether negative space is present or whether the description crowds every part of the frame equally. For multi-character prompts, it also checks whether the framing instruction applies to the full group rather than just one subject. If you write a prompt that says "two characters at a shrine" without specifying that both are fully visible from head to foot, the analysis flags the ambiguity and suggests where to add the anchor. The result is a prompt where the model's guesswork is replaced with specific instruction.
Do I need to describe every detail of the environment in a long shot prompt?
No. Three to five spatial anchors across the frame's depth are enough: what the character is standing on, what surrounds them at their level, what fills the background behind them, and what's in the upper portion of the frame. Beyond that, the model fills in environmental detail on its own, and over-specifying can produce a cluttered frame rather than a composed one. The goal isn't a complete inventory of the setting. It's enough spatial instruction that the model knows the scale of the world, where the camera is positioned within it, and where the character sits relative to both.
Long shots sit at the center of anime's visual grammar — they're the frame that establishes where a story takes place and what the world feels like to inhabit. Getting the prompting structure right connects directly to the broader question of how shot types are sequenced and assembled. The guide on creating extreme long shots in AI anime covers the wide end of the scale spectrum, where the environment fully overtakes the character as the visual subject. For the opposite end, the guide on creating close-up shots in AI anime covers the framing that brings the viewer into the character's face and emotional state. Together, these three shot types give you the full vocabulary for building scenes that feel like they were directed, not generated.