How to Create Motion Blur Lines in AI Anime
The prompting structure that makes movement feel fast, forceful, and impossible to look away from.
Motion blur lines are the visual grammar of anime action. The streaks radiating from a punch, the arc trailing a high kick, the concentric shockwave spreading from a fist hitting stone — these effects are not decoration. They communicate speed, force, and direction in a single frozen frame. Without them, a fight scene is a character standing in a pose. With them, the same character is mid-strike, and you can feel the impact coming.
Most AI anime prompts that attempt motion blur lines fail for one of three reasons: the prompt names the effect without describing its direction, the intensity is left unspecified so the model picks something moderate and unimpressive, or the secondary effects that make motion blur lines read as physically plausible — displaced hair, impact debris, afterimages — are absent. This guide walks through five steps for prompting motion blur lines that look like they came from a production studio, not a generator that tried its best.
👉 Try AutoWeeb and Generate AI Anime Action Scenes with Motion Blur LinesStep 1: Name the effect explicitly and specify what produces it.
The first instruction error in motion blur prompts is naming the visual effect without naming the action that creates it. "Motion blur lines" tells the model what the frame should contain. It doesn't tell the model what is moving, how fast, or in what direction — which means the model has to guess all three, and the results are unpredictable.
The motion blur effect and the action causing it should appear in the same sentence, at the beginning of the prompt. AI anime models recognize several effective terms: "motion blur lines," "speed lines," "action lines," "kinetic blur," and "trailing motion streaks." Each has slightly different rendering tendencies. Speed lines tend to produce the classic manga-style radial streaks. Motion blur lines produce more painterly, directional trails. Kinetic blur produces the most film-like result with actual blur rather than distinct lines. Use the term that matches the visual register you want.
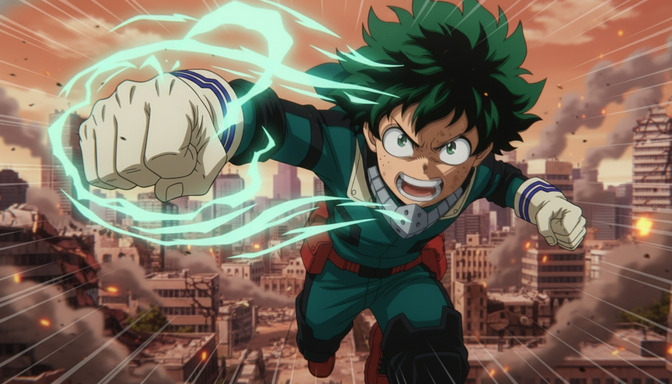
Punch with radial speed lines: radial speed lines emanating from a green-haired fighter's right fist as he throws a straight punch toward the camera, the lines originating at the fist and spreading outward in all directions, the intensity highest at the knuckles and softening toward the edges of the frame, the fighter's body in a forward lean behind the punch.
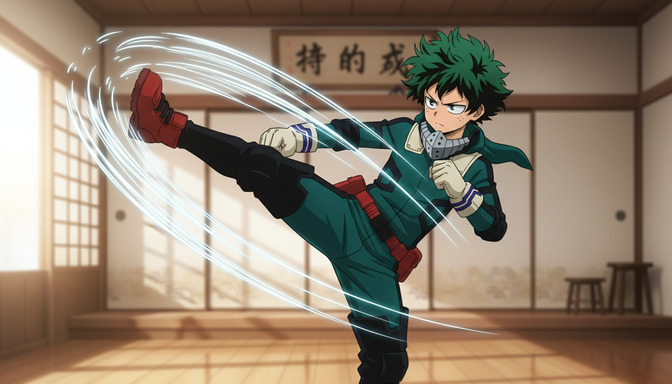
Kick with directional motion blur: directional motion blur lines trailing the arc of a fighter's right leg kick, the lines following the circular path of the kick from hip height through the apex and to the point of impact, the blur streak sweeping from the lower left to the upper right of the frame, the fighter's planted foot anchored in the lower center.
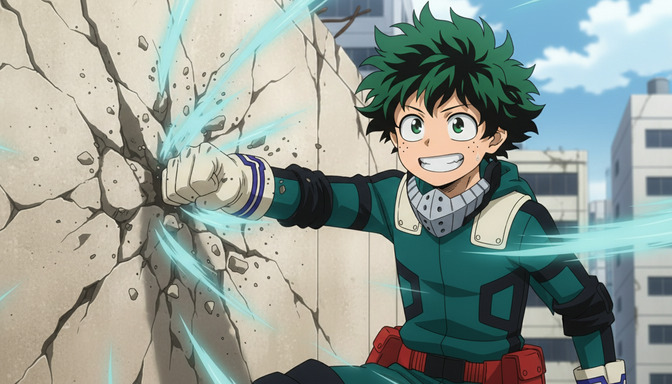
Impact with kinetic blur: kinetic blur and shockwave lines radiating from a fist striking a concrete wall, the impact point at the center of the frame, the blur lines spreading in a starburst pattern from the contact point, cracks forming outward from the center through the wall, dust and debris caught mid-air in the surrounding space.
Step 2: Define the direction and geometry of the blur lines.
Motion blur lines have geometry. A straight punch produces radial lines spreading outward from a single point. A kick produces an arc. A sword slash produces a diagonal or curved trail. A character in a full sprint produces horizontal lines parallel to the direction of travel. Specifying the geometry is what separates motion blur lines that look intentional from ones that look like the model added a visual filter.
Radial geometry, where the lines originate at a single point and spread outward, reads as explosive — best for punches, energy blasts, and impacts. Arc geometry, where lines follow a curved path through the frame, reads as sweeping and graceful — best for kicks, sword strikes, and jump attacks. Parallel geometry, where lines run consistently in one direction across the frame, reads as pure speed — best for dashes, flight, and camera-relative motion. Name the geometry type in the prompt and describe the origin point.
Radial from a single fist: speed lines in a radial burst pattern, origin point at the fighter's right fist extended toward the viewer, lines spreading outward from the fist in all directions at even intervals, the density of lines highest within twelve inches of the fist and fading toward the frame edges, cyan energy light emanating from the fist at the center of the burst.
Arc following a kick: curved motion blur lines following the arc of a high kick from the nine-o'clock position through the twelve-o'clock apex, the arc sweeping counterclockwise in the right half of the frame, the fighter's boot at the leading edge of the arc and the motion trail behind it, the lines tapering from thick near the foot to thin at the arc's origin behind the hip.
Step 3: Set the intensity to match the action's speed and force.
Motion blur intensity communicates two things simultaneously: how fast the limb moved and how much force is behind the strike. A light jab and a full-power finishing blow are the same physical action — a fist hitting a target — but their visual register should be completely different. The jab gets a short, tight burst of lines. The finishing blow gets long streaks that exit the frame, afterimages of the fist visible behind it, and environmental disturbance in the surrounding space.
Intensity has three practical dimensions in a prompt: the length of the blur trails (short suggests fast but contained; long suggests overwhelming speed), the density of lines (sparse suggests sharp precision; dense suggests brute force), and the presence of environmental response (hair and clothing displacement, background distortion, objects caught in the wake). A finishing blow that looks like a finishing blow has all three set to maximum. A precision counter-strike might have short, dense lines and minimal environmental response — controlled power, not raw force.
Low-intensity precision strike: tight radial speed lines emanating from the impact point, the streaks extending no more than six inches outward from the fist, high density of lines in the short burst, the fighter's expression focused rather than strained, minimal hair displacement, the attack communicating precision rather than force.
Maximum-intensity finishing strike: long radial speed lines extending from the fighter's fist to the edges of the frame, the lines exiting the frame on three sides, high density and thick weight to each streak, the fighter's green hair blown back by the force, the background city blurred and distorted by the shockwave, afterimage trails visible behind the fist showing the path of the strike.
Mid-range combat speed: directional motion blur lines trailing the fighter's kick along the arc of its travel, the trails extending approximately eighteen inches behind the foot, moderate density suggesting combat speed rather than peak effort, the fighter's scarf caught and lifting in the wake of the movement, dust particles stirred at ground level where the planted foot has shifted weight.
Step 4: Layer in secondary motion indicators.
Motion blur lines are the primary visual cue for movement. Secondary motion indicators are what make that movement feel physically real. They're the details that confirm the lines aren't just a stylistic overlay but the trace of something that actually happened inside the frame: hair blown back by the force, clothing pressed flat against the body by the air resistance, impact debris launched outward from the contact point, the surface fracturing under the strike.
For punches and strikes, the three most effective secondary indicators are: displacement (hair, scarf, or loose clothing pushed away from the direction of impact), impact material response (cracks spreading from the hit point, stone dust launched outward, a shockwave rippling through water or grass), and afterimages (faint ghost traces of the limb's position a split-second before impact, visible as translucent duplicates behind the final position). Including at least two of these alongside the blur lines produces a frame that reads as a moment in motion rather than a posed character with a visual effect applied.
Impact with debris and cracks: the fighter's right fist making contact with a concrete wall, radial speed lines from the impact point, cracks spreading outward through the wall in a starburst pattern around the fist, chunks of concrete and stone dust launched outward in the lower arc below the point of impact, the fighter's green hair blown back from the force, his body in a low forward lean channeling power through the strike.
Kick with afterimage: the fighter's right boot at the apex of a high kick, motion arc lines trailing behind the leg's path, a faint translucent afterimage of the leg visible at the nine-o'clock position showing where it began the arc, the fighter's scarf displaced upward and to the right from the momentum, the impact target off-frame to the right.
Step 5: Use AutoWeeb's prompt analysis to verify the motion reads before you generate.
Motion blur prompts fail in consistent, predictable ways: the blur direction isn't specified so the model picks a default, the intensity instruction is vague so the output looks moderate, or the secondary indicators are missing so the motion blur lines read as decorative rather than physical. These are structural gaps, not style preferences. AutoWeeb's prompt analysis identifies them before generation, which means you fix the prompt instead of regenerating the same scene four times.
The prompt analysis evaluates the motion description for three things: whether the moving element is named and positioned in the frame, whether the blur geometry and direction are specified, and whether the intensity has enough concrete instruction to produce the effect you're targeting. For action scenes specifically, it also checks whether secondary indicators are present — because a prompt that says "speed lines around the punch" without describing hair displacement, impact response, or afterimages is likely to produce a clean but unconvincing result.
A practical example: take a prompt like anime fighter throwing a punch with speed lines. The prompt analysis will flag the missing direction instruction (radial? linear? arc?), the missing intensity information (tight burst or full-frame streaks?), and the absence of any secondary indicators. The flagged gaps aren't errors — they're the places where your prompt is leaving the model to guess, and where you can add specificity to lock the output closer to what you want.
Once you've addressed the flagged gaps, the prompt becomes something like: radial speed lines emanating from a green-haired fighter's right fist as he throws a straight punch toward the camera, the lines originating at the knuckles and spreading outward to the frame edges, long streaks indicating maximum force, cyan energy at the fist, the fighter's hair blown back from the momentum, stone dust visible in the lower frame from the previous impact, his body leaning forward through the strike. The analysis doesn't write the prompt for you. It maps the space between what you wrote and what the model needs.
For video prompts in Seedance 2, the analysis adds a motion timing check: does the blur intensity match the implied speed for a clip of this length? A two-second clip of a fighter moving at blur-intensity speed should show the impact happening within the clip rather than implying it off-frame. The analysis catches mismatches between the described speed and the clip's implied duration, which is one of the most common reasons action video prompts produce motion blur effects that arrive too late or too early in the clip.
👉 Start Creating AI Anime Action Scenes with Motion Blur on AutoWeebFrequently asked questions about motion blur lines in AI anime.
What is the difference between speed lines, motion blur lines, and action lines in AI anime prompts?
The terms overlap but have different rendering tendencies. Speed lines produce the classic manga-style radial or parallel streaks — sharp, high-contrast, graphic. They read as a stylistic choice as much as a motion indicator, and they're the most reliable term for anime-specific output. Motion blur lines produce a more painterly, directional trail that resembles cinematic motion blur — softer edges, more photographic. Action lines is a broader term that can produce either, depending on the model's defaults. For most anime fight scene work, "speed lines" is the most consistent trigger for the visual effect you're probably after. "Kinetic blur" is useful when you want the effect to look more like a film camera than a manga panel.
Why do my motion blur lines look flat or decorative instead of physically convincing?
Flat motion blur lines almost always come from one of two missing elements: direction specificity or secondary indicators. If the model doesn't know where the blur originates or which way it travels, it places lines symmetrically around the character as a stylistic overlay. If there are no secondary indicators — no hair displacement, no impact response, no material reaction — the blur lines have nothing to anchor them to physical cause and effect. The fix is to describe the origin point of the lines explicitly, name the direction of travel, and add at least one secondary indicator that responds to the same force producing the blur. A punch that displaces hair reads as real. A punch that only has lines around it reads as posed.
Can I prompt motion blur lines for a character I've saved in AutoWeeb?
Yes. When generating from a saved character in AutoWeeb, your character's visual details carry into the scene automatically. In the motion prompt, you describe the action and the blur geometry as normal, and the saved character's appearance — hair color, clothing, distinctive traits — appears in the output without you having to re-specify it. This is especially useful for action sequences, because you can focus the prompt on the motion mechanics and secondary indicators rather than spending word count re-describing the character. If you're building a fighter from scratch for action scenes, the anime character creation guide covers how to design a character whose silhouette and clothing will read clearly at high motion and blur intensity.
How do I prompt motion blur lines for a full-body dash or sprint rather than a single-limb strike?
Full-body motion blur uses parallel lines rather than radial ones. The blur runs in the direction of travel — horizontal for a left-right dash, diagonal for a leaping charge, vertical for a straight upward launch. For a character dashing horizontally, the prompt should specify parallel horizontal speed lines running across the full frame, the character's body blurred or streaking in the direction of movement, clothing and hair blown back against the direction of travel. The character's leading edge (the side moving toward the destination) should be sharp and clear; the trailing edge blurs into the streak. If the entire body is equally blurred, the result reads as camera blur rather than character speed. Sharpness at the leading edge is what sells the motion as the character moving, not the camera failing.
How does AutoWeeb's prompt analysis handle motion blur prompts specifically?
AutoWeeb's prompt analysis breaks down the motion description into its component instructions: what is moving, in what direction, at what intensity, and what secondary effects confirm the motion. For motion blur prompts, it checks whether the blur origin and direction are specified, whether the intensity language is concrete enough to produce a strong effect, and whether secondary indicators are present to ground the motion physically. If you write a prompt that says "punch with speed lines," the analysis identifies the gaps: no direction, no intensity, no secondary indicators. Each flagged gap comes with a suggested addition. You keep control of the prompt; the analysis maps what's missing so you can decide what to add.
What secondary indicators work best for different action types?
The most effective secondary indicators vary by action type. For punches and direct strikes: impact debris, material cracking or deforming at the contact point, and hair blown back in the opposite direction from the strike. For kicks: the arc afterimage showing the leg's path, clothing or scarf caught in the wake, dust kicked up from the planted foot's position shift. For energy attacks: expanding shockwave rings radiating from the blast origin, atmospheric distortion behind the beam, the shooter's body pushed backward by the recoil. For sprints and dashes: ground particles or debris left at the launch point, a faint afterimage at the starting position, motion lines extending beyond the frame to imply the character has moved further than the frame can show. Mixing secondary indicators from different action types — debris from a kick, for instance — produces prompts the model can't resolve cleanly.
Do motion blur lines work differently in video prompts versus still image prompts?
In still image prompts, motion blur lines are a compositional element frozen at a single moment — typically the instant before or at impact. You choose which frame of the action to capture and describe the blur lines at that specific point. In video prompts for Seedance 2, motion blur lines describe the effect across the clip's duration: they should intensify as the limb accelerates and peak at the moment of impact. For video, specifying the timing matters as much as the direction. A prompt that says "speed lines building through the clip as the fighter charges the punch, reaching maximum intensity at the moment of impact at mid-clip" gives the model temporal structure rather than just a visual description. Without timing instruction, the blur effect tends to appear consistently throughout the clip rather than peaking at the intended moment, which reduces the impact considerably.
Motion blur lines are one component of a complete action scene prompt. Getting them right produces a frame where the force and speed are visible before a single secondary detail is read. For the full structure of prompts that make fight sequences look cinematic from start to finish, the guide on creating anime fight scenes with AutoWeeb and Seedance 2 covers the complete workflow from character design to assembled sequence. For specific combat types where motion blur is especially important, the guide on anime sword fight videos covers how weapon trails and blade blur work with the same underlying prompting principles.