Anime Character Creation Workflows: From Concept to Consistent Character
The steps that separate a one-off portrait from a character you can use anywhere
Generating a single anime portrait is easy. Generating a character who looks the same across a dozen different scenes, lighting conditions, and emotional states is something else. The difference is in the workflow. This guide covers every stage of anime character creation, from the first image to a fully deployable character you can use in any scene or video you can describe.
👉 Start Your Character on AutoWeebA strong anime character creation workflow starts with a clear reference image, not a vague text description.
The single biggest mistake in AI character creation is starting with only text. Text prompts are interpretive. The model generates a face, and the next generation changes it. You can never reliably recreate the same face from a text prompt alone, which means any character built entirely on text will drift between generations and become unrecognizable by the third scene.
A reference image anchors the face. It gives the AI something specific to maintain. That specificity is what makes a character feel like a character rather than a series of similar-looking strangers.
The two most reliable paths to a reference image are photo conversion and character library selection. Both produce a fixed visual anchor. Everything else in the workflow builds from there.
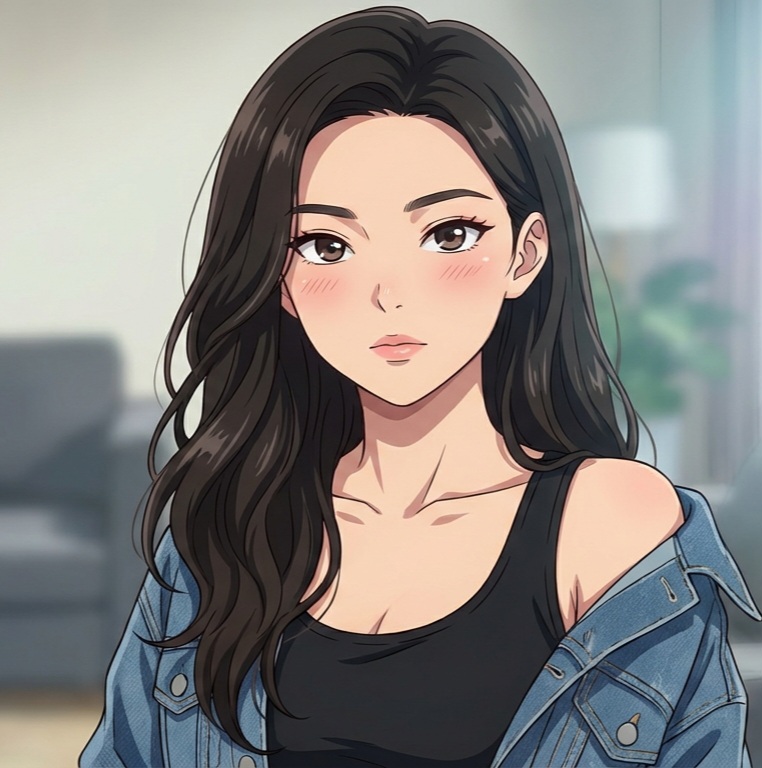
Workflow A: Converting a real photo into an anime character is the fastest way to create a character with a specific, personal face.
Upload a photo of anyone: yourself, a friend, a family member, or a fictional person you want to reimagine. AutoWeeb's photo-to-anime conversion translates the facial structure into anime proportions while keeping the features recognizable. The bone structure, eye shape, and hair silhouette all carry through into the generated portrait.
For the best conversion results, use a portrait where the face is clearly lit, the expression is natural, and the camera is roughly at eye level. Profile shots and extreme angles work less reliably. The goal is a portrait that gives the AI an unambiguous reading of the face.
Once you have a converted portrait you're satisfied with, that image becomes your reference for the next step.
Workflow B: Starting from a shared character design skips the photo step and gets you into scene creation faster.
If you're not working from a real person, AutoWeeb's Shared Characters library offers a set of fully realized anime character designs built by the AutoWeeb team. These come with established visual identities that hold up well across varied scenes and lighting conditions, because they were built to be used as characters rather than one-off images.
Browse the library and select a design that fits the character role you have in mind. You can use it as-is, or use it as a creative jumping-off point and modify the design further in the character creator. Either way, it gives you the same fixed visual anchor that a photo conversion provides.
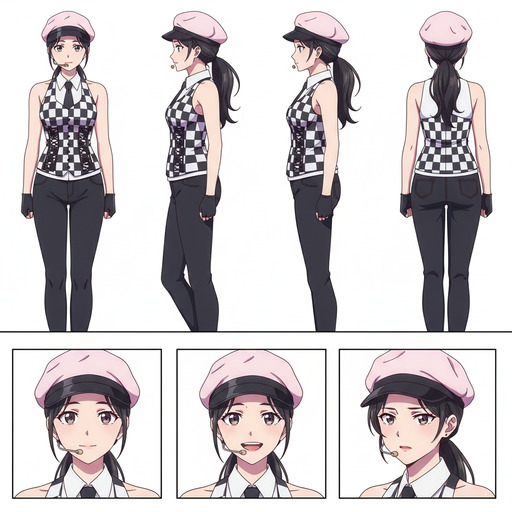
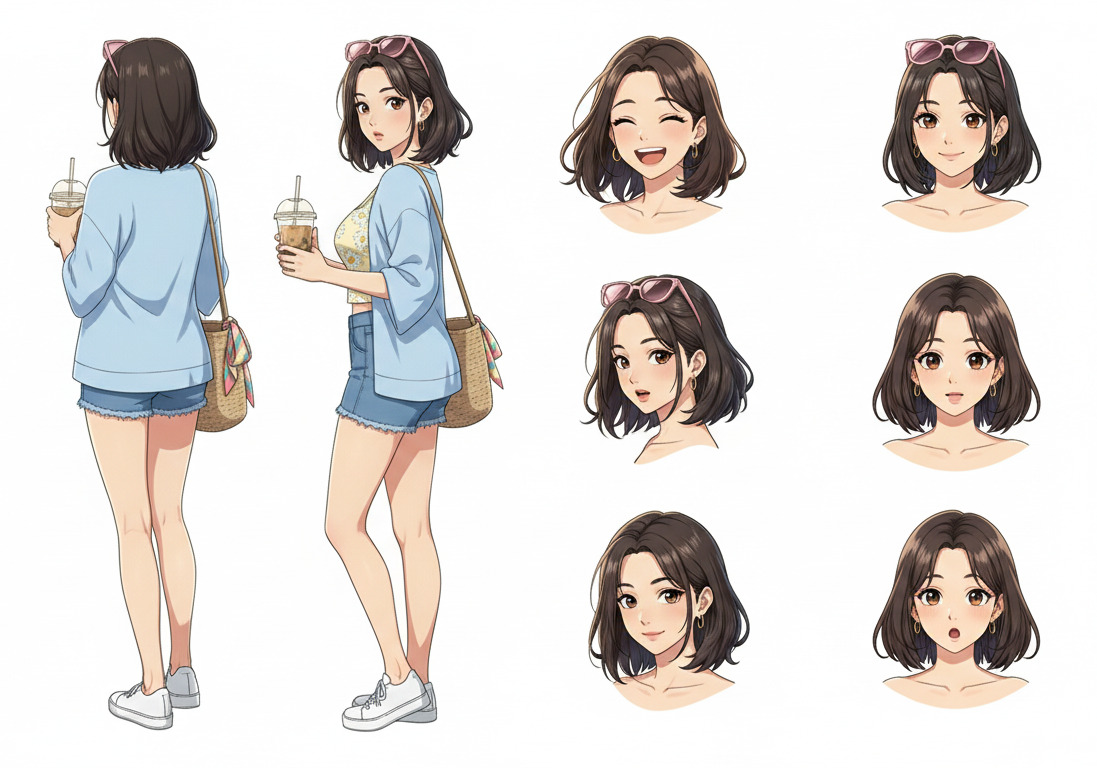
The character sheet is the core tool that makes your character reusable across any scene you generate.
After getting your reference image, the next step is generating a Character Sheet. This is the most important single step in the entire workflow, and it's the step that most tools skip.
A Character Sheet stores your character's full visual identity: the face from multiple angles, the outfit and its colors, the signature accessories, and the expression range. When you generate any image or video using the Character Sheet, the model uses all of that stored visual information as the starting point rather than interpreting a fresh prompt from scratch.
In the Character Creator, use your reference image as the base and then define the details that make the character feel designed:
- Outfit: describe the clothing, the color palette, and any specific details that should appear consistently. "Dark navy school uniform with a single gold button, red ribbon tie" is more reliable than "school uniform."
- Personality keywords: words like "stoic," "cheerful," "determined," or "melancholy" shape how the model renders default expressions and posture. Pick two or three that define the character's energy.
- Archetype: naming an archetype ("detective," "ronin," "idol," "mage") gives the model a cluster of visual conventions to draw from. A "stoic ronin" and a "cheerful idol" hold their posture and express themselves differently even in neutral scenes.
Scene generation with a saved character sheet is where the character stops being a portrait and starts being a character.
With the Character Sheet saved, you can drop your character into any scene you can describe. The prompts for scene generation work differently from portrait prompts. You don't need to re-describe the character's appearance at all. That work is done. The scene prompt should focus entirely on what is happening, where, and in what light.
A good scene prompt built on a Character Sheet:
"Rain-soaked rooftop at night, overlooking a lit city below, character standing at the edge looking down, coat collar turned up against the wind, neon reflections in the puddles, camera at chest height, melancholy atmosphere"
The Character Sheet handles who is in the scene. The prompt handles what the scene is. That division of responsibility is what produces consistent, cinematic results.
For ready-made environments, Photo Packs provide curated scene sets: city streets, festival grounds, school settings, beach scenes, fantasy locations. Drop your character into any of them without writing a full scene prompt from scratch.
Video animation is the final stage, and a still image with a strong composition is the right starting point for it.
Once you have a scene image you're satisfied with, you can animate it. AutoWeeb uses Seedance 2 for video generation. The starting image becomes the first frame of the video, and the motion prompt describes what happens in the following five seconds.
For character animation, the most reliable approach is to focus the motion on elements that naturally move: hair, fabric, ambient environmental details. A character standing in wind with a cloak moving behind them is visually alive without requiring complex body motion. Add a subtle camera push and the scene feels like it belongs in an actual episode.
For action-based animation, see the anime fight scene workflow. For specific video types like magic attacks and sword fights, the Seedance 2 prompting guide covers the exact techniques.
👉 Build Your Anime Character on AutoWeebFrequently asked questions about anime character creation workflows.
What's the most important step in an anime character creation workflow?
Saving a character sheet is the step that changes everything. Without one, each image you generate is independent, and the character drifts. With a saved character sheet, every generation starts from the same visual foundation and the character stays consistent across dozens of different scenes. If you skip any step in the workflow, don't skip this one.
How do I create an anime character without a photo of a real person?
Start from AutoWeeb's Shared Characters library and pick a design that fits the role you have in mind. Alternatively, describe your character concept in a text prompt and generate from scratch using the Character Creator. Text-only character creation requires more iteration than photo-based creation, but it gives you complete freedom over the design. Once you find a result you like, build the character sheet from that generated image.
Can I use the same character in different art styles?
Yes. AutoWeeb supports multiple anime art styles, and you can apply different styles to the same character sheet. The character's face and design carry through while the visual aesthetic shifts. Your character can appear in the Ghibli style, the Demon Slayer style, or a cyberpunk aesthetic, and they'll still read as the same person.
How many scenes can I generate from a single character sheet?
There's no limit. A saved character sheet can anchor an unlimited number of images, photo pack generations, and video clips. The more scenes you create, the more the character builds up a visual library of moments. Many AutoWeeb users build what amount to small visual novel-style narratives from a single character sheet over dozens of generations.
What photo makes the best starting point for an anime character conversion?
A well-lit portrait where the face is clearly visible and the expression is natural or neutral. The camera should be roughly at eye level, the face should take up most of the frame, and the lighting should be even or softly directional. Avoid extreme angles, heavy shadows over the face, or photos where the subject is far from the camera. Sunlit outdoor portraits and indoor shots near a window work particularly well.
For more on specific parts of this workflow, read the guide to AutoWeeb's character creator and our overview of how to create your own anime character. Once your character is ready, the photo packs guide shows how to place them into curated scene sets.