How to Create Anime Videos Like "Attack On Wemby"
A complete workflow for creating original anime videos starring a real-world athlete or original character: build the character, write and storyboard the story with AutoWeeb's AI Agent, create locations, design a full cast, @tag every asset in each shot, and generate images and video.
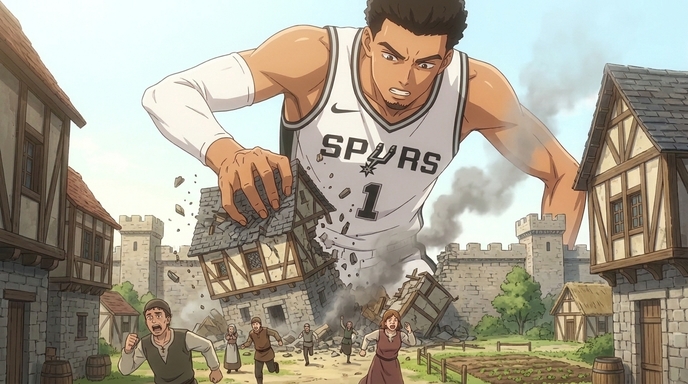
"Attack on Wemby" is not a licensed series. It is an original anime concept built around one of the most visually striking athletes in professional sports, Victor Wembanyama, a player so physically anomalous that the anime comparison writes itself. Giant. Otherworldly. Moving in ways that should not be possible at that scale. The internet recognized it immediately, and the concept took off as fan art, edits, and video clips. What nobody had was the full anime. The character arc, the medieval village, the squad of teammates in period clothing, the contemplative cliff scene before the final confrontation. That is what this guide builds.
The workflow here covers the complete AutoWeeb production pipeline for a concept-driven anime: creating a character from scratch, using AutoWeeb's AI Agent to write the script and storyboard, building locations, designing a full cast with outfit variations, @tagging every saved asset in each storyboard shot so the AI draws from exact references, generating the images, and animating the key scenes into video. The same pipeline works for any athlete, original character, or pop culture figure you want to cast as an anime protagonist.
Step 1: Create Your Main Character
Every anime production starts with a character sheet. For a concept like Attack on Wemby, the character sheet needs to do two things simultaneously: capture the recognizable visual identity of the real-world person it is based on and translate that into a consistent anime design that will hold across every scene you generate.
Writing the Character Description
Open AutoWeeb's character creator and write a complete visual reference for your protagonist. Do not describe what you want the character to feel like. Describe what they look like, specifically. Height relative to other characters, hair, facial features, build, default outfit, and the specific quality of their posture and expression that communicates who they are before they say a word.
Example main character sheet prompt for an Attack on Wemby-style protagonist: "Male, extremely tall, visibly towering over every other character in frame, lean and long-limbed with unusually large hands. Close-cropped dark hair, sharp angular jaw, wide-set dark eyes with an expression that reads as alert and slightly detached, taking in the environment rather than reacting to it. Default outfit: white basketball jersey with team insignia, number 1, over a long-sleeved base layer. In action shots, the jersey is slightly wrinkled from movement. Default posture is upright and still, the kind of stillness that comes from not needing to prove anything. Anime style, clean dramatic linework, shonen proportions."
Save this character sheet to your AutoWeeb project library as soon as it produces a result you want to anchor the production to. Every subsequent generation in the project will reference this saved sheet, which is what keeps the protagonist looking like the same person in a training scene, a battle sequence, and a quiet moment at the edge of a cliff.
Outfit Variations
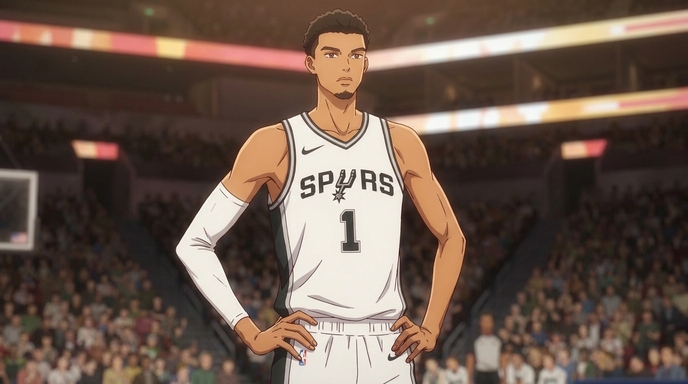
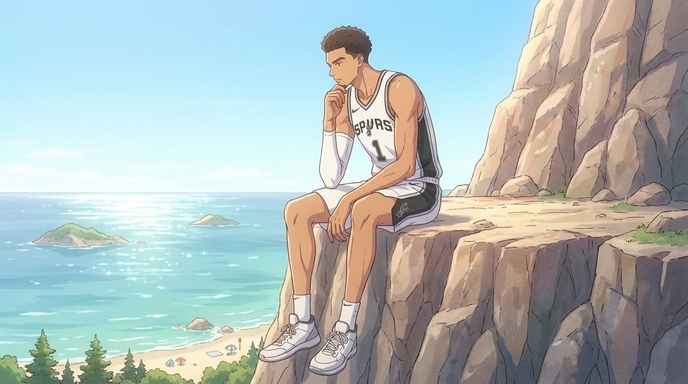
Build at least two outfit variations alongside the default: one for action sequences in the main story setting, and one for an alternate context that creates visual contrast. For an Attack on Wemby concept, the basketball jersey as default reads differently against a medieval village than against a modern arena, and both have narrative uses. Create a third variation for a quieter, more introspective scene, the cliff moment, the walk through the ruins, the post-match solitude that shonen anime earns through contrast with the action.
Step 2: Write Your Script and Storyboard with AutoWeeb's AI Agent
AutoWeeb's AI Agent is the writing and planning layer of the production. Once your character sheet is saved, open the Agent and give it the concept, the genre tone you are going for, and the emotional arc you want the story to follow. The Agent will generate a scene-by-scene script and a storyboard structure, which you then refine into the specific shots you want to generate.
Prompting the AI Agent for Script and Story Structure
Be specific about tone and structure when you brief the Agent. "Attack on Titan aesthetic, sports protagonist displaced into a fantasy setting, three-act arc, approximately six scenes" gives the Agent enough to produce something useful. A brief like "make me an anime" does not.
Example Agent prompt: "Create a script and storyboard for a six-scene anime short. The protagonist is a modern basketball player, 7'4\", physically towering, who appears in a medieval European fantasy village as a titan-scale figure. The tone is Attack on Titan meets shonen sports anime. Arc: Act 1, the giant arrives and the village panics; Act 2, a quiet moment of isolation as the giant surveys the world from a coastal cliff; Act 3, a confrontation at the village square that reveals the protagonist is not a threat but a protector. Include storyboard shot descriptions for each scene."
The Agent will return a full script with dialogue and scene descriptions, plus storyboard panel breakdowns for each sequence. Review these against your concept and refine. The storyboard output is the production plan: every panel in the board is an image you will generate in a later step.
Shot Design in the Storyboard
For each storyboard panel, the AI Agent generates a shot description covering camera angle, character position, and the emotional beat the shot is meant to carry. For a concept built on scale contrast, the low-angle shot is your primary tool. A character framed from below reads as enormous. A character framed from above reads as isolated. Use both deliberately across the arc. The most effective Attack on Titan-style shots alternate between the titan's perspective (wide, elevated, surveying) and the ground-level reaction of the people below (low angle, tight, chaos in the background).
Step 3: Create Your Locations
Each location in your storyboard needs a saved reference in your AutoWeeb project library, the same way each character does. A location reference is a prompt that describes the visual identity of the place with enough specificity to regenerate recognizably consistent environments across multiple scenes.
Building Location References
For an Attack on Wemby-style production, you need at minimum three locations: the medieval village (the opening scene and the climax), the coastal cliffside (the quiet middle act), and either the interior of a structure or an establishing wide shot of the world map that contextualizes the setting.
Example village location prompt: "Medieval European village, compact timber-frame buildings with thatched roofs, a cobblestone square with a stone well at the center. Visible stone wall sections at the perimeter suggesting a fortified town. Warm midday light casting sharp shadows between buildings. Scale references built into the composition: the buildings are normal human-sized, which means a titan-scale protagonist would be level with the rooftops. Anime style, Attack on Titan environment aesthetic, slightly desaturated color palette."
Example cliffside location prompt: "Rocky coastal cliff, steep face dropping to the ocean below, small pine trees visible on the ridge line. Afternoon light, high clear sky, the water below calm and blue-green. The cliff edge is wide enough for a large figure to sit at the edge without it reading as precarious. Distant islands visible on the horizon. Anime style, contemplative and open, Ghibli-influenced natural light treatment."
Save each location to your project library before generating any scenes. When a storyboard panel is set in the village, you will @tag the village reference. When a panel is set on the cliff, you will @tag the cliff. This is how the village looks like the same village in scene one and scene six.
Step 4: Create More Characters and Change Their Outfits and Looks
A compelling anime needs more than one character. The Attack on Wemby concept has natural supporting cast slots: the basketball teammates reimagined in period clothing, the village leader trying to understand what just appeared in the town square, the one villager who is not afraid and approaches the titan. Each of these characters needs their own sheet.
Building the Supporting Cast
For each supporting character, write a shorter but equally specific reference. Focus on the visual details that make them instantly distinguishable in a crowd scene: silhouette, hair, one defining costume element. For teammates reimagined in medieval context, start from their real-world visual identities and transpose them into the setting: a player known for a specific look gets a consistent version of that look adapted to the fantasy context.
Example teammate character sheet prompt: "Male, late teens to early twenties, athletic build, medium height compared to the protagonist. Short-cropped hair, intense competitive expression, wears a medieval-adapted version of the team uniform: linen tunic in team colors with the player number stenciled at the chest, leather belt, rough-spun trousers. Carries himself like someone who has been in every battle the protagonist has been in and intends to be in the next one. Anime style, shonen."
Outfit and Look Variations
AutoWeeb lets you generate outfit variations for any saved character. For a production that spans modern and fantasy settings, you want at minimum one outfit per setting for each major character. The protagonist in a basketball jersey against a medieval backdrop carries one kind of visual energy. The protagonist in fantasy armor carries a different one. Both are valid story tools, and both need to be saved references so the character's face and physical identity remain consistent across the costume change.
For the supporting cast, create a variation that reflects the story's progression: their appearance before they trust the protagonist versus after. A costume that shows wear from the central events. An expression that has shifted. Anime series earn the emotional payoff in the final act by showing, visually, that the characters have been changed by what happened. Build those changes into the character sheets as named variations before you generate the scenes where they appear.
Step 5: @Tag All Your Assets in Each Storyboard Shot, Then Generate Images
This is the step that separates a production from a collection of prompts. AutoWeeb's @tagging system lets you reference any saved character sheet or location directly inside a storyboard shot prompt. When you @tag a character, the generation draws from your saved visual reference for that character rather than reconstructing them from context in the prompt text. The same applies to locations. @tag the village and the generation uses the village you built in Step 3, not a generic fantasy village.
How to Structure an @tagged Shot Prompt
For each storyboard panel from your AI Agent output, write the shot description and add @tags for every named asset that appears in the frame. A shot with the protagonist in the village square during the opening panic scene should @tag the protagonist character sheet, the village location, and any supporting characters who are in the frame.
Example @tagged storyboard shot prompt: "Wide establishing shot, the village square. @wemby-protagonist stands center frame, occupying the full vertical space of the composition from ground to above rooflines, looking down at the square. @medieval-village in the background. @teammate-1 and @villager-leader visible in the foreground, staring upward, @villager-leader with both hands raised, @teammate-1 with hand on sword handle but not drawing. Warm midday light, slight motion blur on the fleeing background figures. Anime style, Attack on Titan environmental scale."
Generate scenes in the order they appear in your storyboard, working from the first shot of each scene forward. Review each generated image against the storyboard beat it covers before moving to the next panel. This catches visual inconsistencies before they compound across the episode.
Checking Consistency Across Shots
After generating a full scene's panels, review them as a sequence rather than individually. The protagonist should occupy the same relative scale in every village scene. The lighting on the cliffside should be consistent across the two or three panels set there. If something has drifted from a prior reference, return to the relevant @tagged prompt and regenerate before continuing. Catching drift at the scene level is easier than correcting it across a finished episode.
Step 6: Generate Videos and Assemble Your Anime
Not every storyboard panel needs to become a video clip. Prioritize the four or five shots per episode where motion carries information that a still frame cannot. For an Attack on Wemby concept, those are almost always: the first reveal shot of the protagonist at titan scale, the approach to the village, the cliffside turn that establishes the character's interiority, and the climax confrontation that resolves the story's central question.
Writing Motion Prompts for Key Scenes
Write a motion description for each priority panel before sending it to AutoWeeb's video generator. The description should specify what moves, how fast, and what the camera does. The more specific the motion description, the closer the resulting video clip is to the intended scene.
Example video motion prompt for the titan arrival scene: "Wide low-angle shot, a titan-scale figure stepping into a village square from the left side of frame. The footstep lands at the two-second mark, stone cobblestones cracking at the point of contact. Camera is positioned at ground level, villagers scattering in the foreground. The giant's full body is not visible in the first beat, only from the waist down, scale established through the comparison to surrounding buildings. Camera begins a slow tilt upward at four seconds, revealing the full figure. The motion is deliberate, not aggressive. Anime style, Attack on Titan environmental tone, five to seven seconds."
Generate each video clip and review it as part of the scene sequence before moving to the next one. A three-to-five second clip that lands the shot's intention is more valuable in an assembled episode than a ten-second clip that drifts from the storyboard's spatial logic.
Assembling the Episode
With still panels for every storyboard beat and video clips for the priority scenes, assemble the episode in sequence. Still panels carry dialogue and quieter character moments. Video clips carry the kinetic sequences and the scenes where motion is the point. The full assembled episode is a combination: stills for continuity and character, video for the moments the production was built to deliver. Export the assembled sequence for upload to YouTube or TikTok, with a sixty-second cut from the highest-impact clips for short-form distribution.
Frequently Asked Questions
Can I create an anime based on a real athlete or public figure?
Fan-created anime and parody works based on public figures have a long history in anime culture. Attack on Wemby-style content is a creative interpretation, not a commercial product claiming affiliation with the NBA or the player. The same applies to any athlete or public figure you want to use as the basis for an original anime concept. AutoWeeb generates original anime art from your descriptions; the creative framing of the concept is yours to shape.
What makes the @tag system different from just describing a character in the prompt?
When you describe a character from scratch in each individual prompt, small variations accumulate across generations. Hair that reads slightly different, a build that shifts subtly, an expression that does not match the sheet. The @tag system references a saved document rather than re-describing from memory, which means the character in panel one and the character in panel twenty are drawn from the same visual anchor. For a production with a recognizable real-world subject at its center, that consistency is especially important. The audience knows immediately if the protagonist's face has drifted between scenes.
How do I capture an athlete's real appearance in an anime character sheet?
Focus on the physical specifics that make the person immediately recognizable, and translate those specifics into anime visual language rather than trying to generate a photorealistic likeness. For Wembanyama, that is the extreme height, the unusual arm span, the lean build, the large hands, and the particular quality of unhurried physical confidence in how he moves. Those details in a character sheet produce a character that reads as Wemby even in full anime style, because the audience is reading the combination of physical markers rather than comparing to a photograph.
How many characters should I build sheets for before starting image generation?
Build sheets for every character who appears in more than two scenes before generating any storyboard panels. For a six-scene short in the Attack on Wemby format, that is typically the protagonist, two to three supporting characters, and the primary villager or antagonist who drives the confrontation in the final act. Characters who appear briefly as background figures do not need full sheets, but any named character with a close-up or dialogue moment does.
Which scenes should I prioritize for video generation versus keeping as still images?
Prioritize video for scenes where the story's emotional impact depends on movement: the arrival that establishes scale, the approach or movement that carries physical threat or wonder, the climactic physical action, and the one quiet scene where a character's movement, a turn of the head, a shift in posture, carries emotional weight that a freeze frame cannot hold. Scenes that are primarily dialogue, reaction, or planning work well as stills and do not lose meaningful information by staying static. Spend video generation on the moments that would feel incomplete without motion.
Can I use the same workflow for other sports anime concepts?
Yes. The workflow here applies to any athlete-as-anime-protagonist concept, whether the sport is basketball, soccer, tennis, or hockey, and whether the setting is realistic or genre-shifted like Attack on Wemby. The character sheet, AI Agent scripting, location building, @tag generation, and video pipeline are the same across all of them. The sport and setting inform what you put into each step; the production structure stays consistent.
How long does it take to produce a complete short anime using AutoWeeb?
A six-scene short with three to five video clips takes most users two to four focused sessions in AutoWeeb. The first session covers character sheets and location references. The second covers AI Agent scripting and storyboard generation. The third covers image generation across the storyboard panels. The fourth covers video generation for priority scenes. Working in sessions rather than one continuous run makes it easier to review each stage's output against the production plan before committing to the next one.
For the broader sports anime production pipeline, including tournament arc structure, rival design, and training montage storyboards, the guide on how to create a basketball anime using AutoWeeb covers the full season-length production workflow. If your anime concept is built around an original character rather than a real athlete, how to create your own sports anime series with AutoWeeb covers sport selection, cast design, and episode structure from scratch.