The Ultimate AI Anime Pre-Production Checklist for Creators
A phase-by-phase production checklist covering everything from story development to final editing, built for creators using AI tools to produce original anime.
Most AI anime projects stall at the same point: somewhere between the first image and the realization that the character looks different in every scene, the script was never written down, and no one defined what the school rooftop actually looks like. The tools are not the problem. The missing pre-production is.
Professional anime studios run through a structured pre-production pipeline before a single frame is animated. That discipline exists because consistency, storytelling, and production speed all depend on decisions being made before you're deep inside a scene. This checklist applies that same discipline to AI anime production, organized into ten phases that scale from a simple short to a multi-episode series. Use it to catch every decision before it becomes a continuity problem.
How to Use This Checklist
Each phase below includes checkboxes for individual tasks. Not every task applies to every project, but skipping a phase entirely almost always creates problems downstream. A creator who skips character sheets will regenerate the protagonist ten times trying to recover a look that was never locked down. A creator who skips location design will find that every outdoor scene feels like a different city.
The recommendations are organized by experience level:
- Beginner: Complete the starred items in each phase. Focus on phases 1, 2, 3, and 6 before anything else.
- Intermediate: Work through every item in the phase. Treat each phase as a production sprint before moving to the next.
- Advanced: Use this as a sign-off document. No phase is closed until every item is checked. Assign phase owners if working with a team.
Phase 1: Story Development
Every production decision downstream flows from story decisions made here. A vague story concept produces vague character designs, vague locations, and vague storyboards. The goal of this phase is a clear story document that every other phase can reference.
Skipping story development is the most common reason AI anime projects lose momentum. Without a defined ending, there is no way to know which scenes are essential and which are tangents.
- ☐ Define your concept in one sentence. Genre, protagonist, central conflict, and tone. If you cannot say it in one sentence, the concept is not clear enough yet. (Beginner+)
- ☐ Write a short synopsis (one paragraph). Beginning, middle, and end. The synopsis is not a script. It is a compass for every decision that follows. (Beginner+)
- ☐ Define the emotional core. What feeling should the viewer leave with? This determines the visual tone, pacing, and the weight of every scene. (Beginner+)
- ☐ Establish your world's rules. Even a school slice-of-life has rules. What is possible? What is not? Undefined rules produce inconsistent scenes. (Intermediate+)
- ☐ Plan your act structure. Three-act for a short. Episode-arc structure for a series. Note the major turning points by scene. (Intermediate+)
- ☐ Write a scene-by-scene outline. Not full script, just one line per scene: who is in it, where, what happens, and what changes. (Advanced)
Phase 2: Character Design
Character design in AI anime is a creative and a technical problem. The creative part is figuring out who the characters are and what they look like. The technical part is writing those decisions down in enough detail that your AI tool can reproduce them reliably. Vague character descriptions produce inconsistent results. A character defined as "a girl with blue hair" will look different every time. A character defined with specific details, hair length, eye shape, distinguishing marks, signature clothing, will hold across dozens of generated scenes.
- ☐ List every character who appears in the story. Include supporting characters and background characters who appear more than once. (Beginner+)
- ☐ Define each character's role. Protagonist, antagonist, mentor, comic relief, love interest. Role shapes design priorities. (Beginner+)
- ☐ Write a full visual description for each main character. Hair (length, texture, color), eyes (shape, color, expression tendency), build, skin tone, distinctive features, and default expression. Be specific: "dark auburn hair with a loose side braid" is useful. "Brown hair" is not. (Beginner+)
- ☐ Define each character's signature outfit(s). Include colors, layers, accessories, and any damage or wear that signals their history. (Beginner+)
- ☐ Note personality traits that should read visually. A stoic character has a different default posture than an anxious one. These inform how expressions and body language are described in scene prompts. (Intermediate+)
- ☐ Collect reference mood boards for each character. Anime screenshots, illustration styles, color palettes. Reference reduces generation iterations significantly. (Intermediate+)
- ☐ Define visual contrast between characters. Two characters who look too similar in silhouette are hard to tell apart in action scenes. Vary height, build, and hair silhouette deliberately. (Advanced)
Phase 3: Character Sheets
A character sheet is a locked, approved visual reference for a character. It is the single source of truth for that character's look across every scene in your project. In AutoWeeb, saved character sheets are the mechanism that makes this work: you define the character once, save it to your library, and tag it into every panel from that point on without re-describing it.
Creators who skip character sheets and go directly to scene generation spend enormous amounts of time regenerating and manually correcting images. The protagonist who looks subtly different in panel 18 than in panel 3 is not a small problem. It breaks the narrative logic of the entire storyboard.
- ☐ Generate a front-facing neutral reference image for each main character. This is the baseline the generator will use to maintain consistency. Approve this image before generating any scenes. (Beginner+)
- ☐ Generate a profile or three-quarter view for each main character. Action scenes frequently use angles. Having a non-frontal reference catches issues before they appear in storyboard panels. (Intermediate+)
- ☐ Build expression sheets for protagonists and major characters. Neutral, happy, angry, sad, surprised, determined. Expression sheets are critical for emotional scenes where the character's face carries the scene. (Intermediate+)
- ☐ Save every approved character to your project library. In AutoWeeb, this means building the character in the character sheet builder and saving them before starting any storyboard panels. (Beginner+)
- ☐ Lock the character description. After approval, do not change the core character description mid-project. Changes to saved character sheets will produce inconsistency in any panels generated after the change. (Beginner+)
- ☐ Create alternate outfit sheets for characters who change costume. A character who appears in their school uniform in episode one and battle gear in episode two needs both approved before either is used in scenes. (Advanced)
The guide on how AutoWeeb's AI agent helps you build original anime characters covers the character sheet workflow in detail, including how the AI agent assists with visual description refinement and consistency.
Phase 4: Locations
Locations are the visual world of your story. A well-defined location sheet tells the generator what the world looks like so that the background of panel 5 is consistent with the background of panel 30. Skipping location sheets means every outdoor scene looks like a different city and every indoor scene feels like a different building.
- ☐ List every location that appears in your scene outline. Include both major recurring locations and one-time locations. (Beginner+)
- ☐ Write a descriptive paragraph for each location. Architecture style, atmosphere, dominant colors, time period. A cramped urban apartment reads differently than an airy seaside school, and your prompts need to communicate that difference. (Beginner+)
- ☐ Define default lighting conditions for each location. Time of day, weather, interior vs. exterior, artificial vs. natural light. Lighting affects mood significantly and should be defined per location rather than per panel. (Intermediate+)
- ☐ Generate and approve an establishing shot reference for each major location. This becomes the visual anchor for all scenes set in that location. (Intermediate+)
- ☐ Note which locations appear across multiple episodes or scenes. Recurring locations should have consistent reference images saved to the project. (Advanced)
- ☐ Build interior and exterior variants for locations that have both. The exterior of the school and the interior of the classroom are different prompts and should be defined separately. (Advanced)
Phase 5: Props and Assets
Props are easy to overlook and painful to fix later. A sword that changes design between scenes, a school bag that disappears in some shots, a magical artifact that looks different every time it appears: these are all symptoms of props that were never defined. For significant props, a reference image treated the same way as a character sheet prevents the problem entirely.
- ☐ List every significant prop in the story. Focus on items that appear multiple times or have narrative importance. (Beginner+)
- ☐ Write a visual description for each hero prop. Shape, material, color, scale relative to the character who carries it. (Intermediate+)
- ☐ Generate reference images for props that are visually distinctive. Weapons, magical objects, vehicles, and any prop that has a specific design that must stay consistent. (Intermediate+)
- ☐ Note which characters carry which props by default. A character who always carries a notebook has that item in their baseline description. Props that appear only in specific scenes are noted in the scene prompt, not the character sheet. (Advanced)
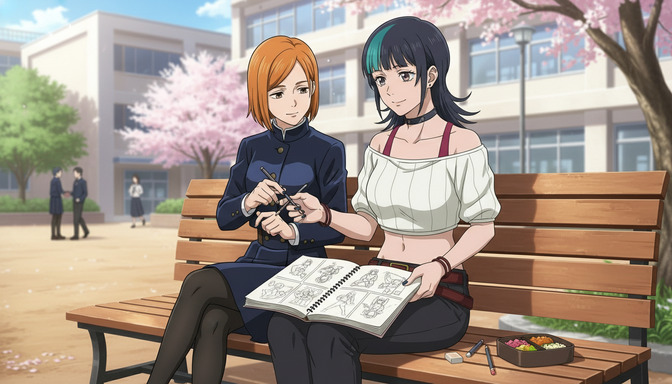
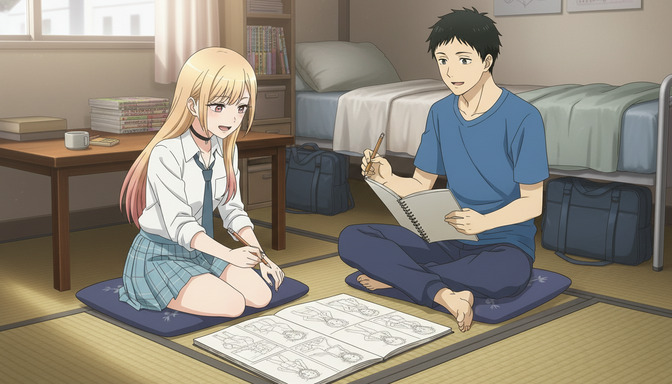
Phase 6: Script Writing
A script is not just dialogue. It is the precise specification of what happens in every scene: who speaks, what they do, where they move, and what the camera sees. Without a script, storyboarding becomes guesswork, and the emotional logic of scenes gets lost between the idea and the image.
- ☐ Write full dialogue for every scene. Even approximate dialogue. Scripts written before storyboarding produce tighter storyboards because the camera follows the story rather than filling space. (Beginner+)
- ☐ Include action lines describing character movement and reactions. "Yuki turns away from the window and sets the letter on the table without opening it" is a storyboard panel. "Yuki looks sad" is not. (Beginner+)
- ☐ Note transitions between scenes. Cut, dissolve, match cut, fade to black. Defined transitions in the script map directly to storyboard transition panels. (Intermediate+)
- ☐ Mark scenes that require visual effects or special animation. Magic, weather, explosions, transformation sequences. These scenes need extra storyboard panels and more detailed prompts. (Intermediate+)
- ☐ Review each scene for pacing. Read each scene aloud at the intended playback speed. If a dialogue exchange takes longer to read than it would take to watch, cut it. (Advanced)
- ☐ Review the full script for emotional arc continuity. Each scene should leave the characters in a different emotional state than when the scene started. A scene that ends the same way it began is a scene that doesn't need to exist. (Advanced)
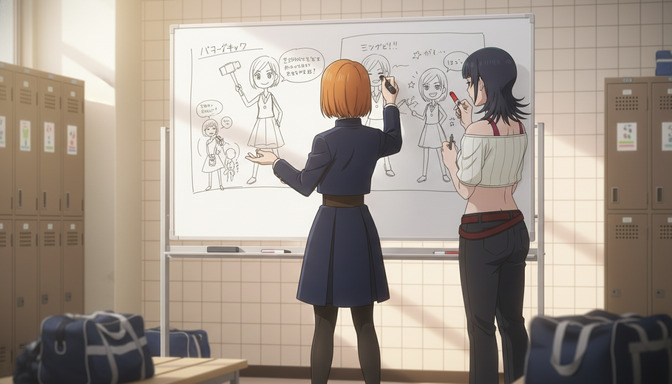
Phase 7: Storyboarding
The storyboard is the production blueprint. Every panel corresponds to a single shot in the final animation. The storyboard is also where the AI anime workflow pays off most visibly: with locked characters, defined locations, and a written script, each storyboard panel prompt is a precise instruction rather than a guess.
Skipping storyboarding and generating scenes directly from a script description produces a collection of images, not a coherent sequence. The storyboard creates shot-to-shot continuity.
- ☐ Write a shot list for each scene before generating images. Which shots are required to tell this scene's story? Start, middle, and end of each scene, at minimum. (Beginner+)
- ☐ Begin every new location with an establishing shot. An establishing shot orients the viewer and sets the visual context for every cut that follows. Missing establishing shots make scenes feel spatially disorienting. (Beginner+)
- ☐ Add camera angle descriptions to each panel prompt. Wide shot, mid-shot, close-up, extreme close-up, over-the-shoulder, low angle, high angle, dutch tilt. Camera angle determines emotional register as much as character expression does. (Beginner+)
- ☐ Note camera movement intent in panel descriptions. Slow push into a face communicates dread. A quick pull-back communicates shock. These notes inform video generation later. (Intermediate+)
- ☐ Tag saved characters into each panel rather than re-describing them. In AutoWeeb, character tagging is the mechanism that maintains visual consistency across a 50+ panel storyboard. (Beginner+)
- ☐ Review the completed storyboard for shot-to-shot continuity. Does the character's position make physical sense between cuts? Does the eyeline match? Does the lighting stay consistent within a scene? (Intermediate+)
- ☐ Expand action scenes to their full shot count. A fight sequence that takes up two script lines typically requires 12 to 20 storyboard panels. Plan for the expansion before generating. (Advanced)
The guide on why character tagging in AutoWeeb makes storyboarding faster and more consistent covers the mechanics of maintaining character fidelity across a long storyboard in detail.
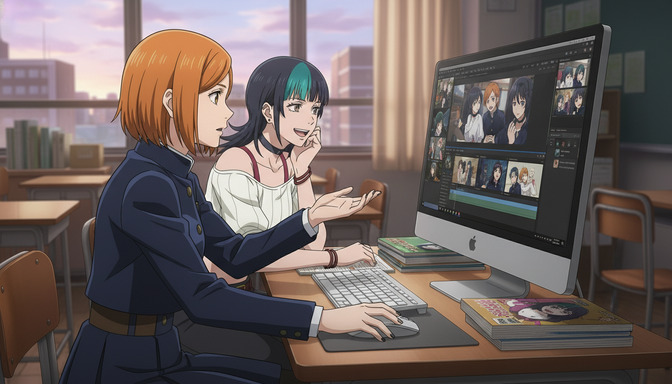
Phase 8: Image Generation
Image generation is where the pre-production investment pays off. With characters, locations, and storyboard prompts all defined, each image generation session is guided rather than exploratory. The goal of this phase is not to generate as many images as possible. It is to approve a clean, consistent set of images that can be assembled into a coherent sequence.
- ☐ Generate all character reference images before generating scene panels. Start every session by confirming that character generation is working correctly before investing time in scene images. (Beginner+)
- ☐ Generate location reference images before populating them with characters. Establishing location backgrounds first prevents the common problem of a character looking correct but placed in an inconsistent environment. (Intermediate+)
- ☐ Work through the storyboard in scene order, not panel order. Generating all panels of a single scene together produces better lighting and tonal consistency than generating panels from different scenes in sequence. (Intermediate+)
- ☐ Review each generated panel against the storyboard shot intent. Does the framing match what you specified? Does the expression communicate the emotion required by the script? (Beginner+)
- ☐ Regenerate panels where character look has drifted before moving forward. One inconsistent panel makes the entire scene harder to use in video. Fix it before generating the next scene. (Beginner+)
- ☐ Approve all images for a scene before moving to video production for that scene. A consistent visual pass across a full scene produces much cleaner animated output than a patchwork of individually approved panels from different sessions. (Intermediate+)
Phase 9: Video Production
AI video generation from approved storyboard images is the stage where pre-production investment compounds most dramatically. An approved image with specific motion notes, a framing designed for movement, and a character whose position makes physical sense in the shot produces animated output that is directly usable. An image that was generated without these considerations produces motion that needs to be regenerated.
- ☐ Select scenes for video generation based on narrative priority. Not every panel needs to become a video clip. Dialogue-heavy scenes may work better as image sequences with audio than as AI-generated video. Action and transition scenes benefit most from video generation. (Beginner+)
- ☐ Write motion descriptions for each panel going to video generation. The type of movement (camera push, character movement, ambient environment) should be specified. (Beginner+)
- ☐ Ensure characters are contained within the frame before generating video. Action and expression should be visible throughout the intended duration of the shot. Characters entering or exiting the frame mid-action produce unusable motion clips. (Intermediate+)
- ☐ Generate video clips scene by scene and review before moving to the next. Consistent output at the scene level is easier to edit than fixing motion problems across a full episode. (Intermediate+)
- ☐ Regenerate clips where motion direction contradicts the story intent. A slow, atmospheric push into a character's face that generates as a fast camera snap is not a "good enough" clip for an emotional scene. The motion is part of the story. (Advanced)
Phase 10: Final Editing
Final editing is where the production becomes a watchable piece of content. The editing phase is not a technical formality. It is where pacing is finalized, emotional impact is sharpened, and the story becomes the experience the viewer receives. Many AI anime projects that survived the entire production pipeline lose their impact in this phase because editing decisions are made without reference to the story's emotional intent.
- ☐ Assemble clips in scene order and review the rough cut against the script. Does the visual sequence match the story as written? (Beginner+)
- ☐ Add and adjust transitions between scenes. Cut, dissolve, and fade transitions each carry a different emotional weight. Match the transition type to the narrative moment. (Beginner+)
- ☐ Sync dialogue or voice-over to the video sequence. Timing dialogue to the character's expression and camera framing is as important as the dialogue itself. (Intermediate+)
- ☐ Add music and sound effects. Select music that matches the emotional arc defined in Phase 1, not just the mood of individual scenes. (Intermediate+)
- ☐ Review the full cut for pacing against the emotional arc. Watch it once without stopping. Note every moment where attention drifts. Those are the moments to cut or restructure. (Advanced)
- ☐ Export the final cut at the intended distribution format. Resolution, aspect ratio, and file format defined by the platform. (Beginner+)
Complete Workflow Example: A Short Anime Episode in AutoWeeb
Here is how all ten phases connect in a real production using AutoWeeb. The project: a five-minute slice-of-life short about two high school students who discover they have been writing letters to each other anonymously for months.
Story Development
The creator writes a one-paragraph synopsis in AutoWeeb's script workspace. The story has three scenes: the classroom where the protagonist receives the final letter, the rooftop where she figures out who wrote it, and the hallway where they finally speak. The emotional core is relief after months of uncertainty. The world rule is simple: everyone in this school carries a little too much unsaid.
Character Design and Character Sheets
Two characters. Hana: warm-toned skin, short copper-brown bob cut with a slight curl at the ends, wide amber eyes with a tendency toward a slightly embarrassed expression, navy school uniform with a small enamel pin on the collar. Kenji: taller, close-cropped dark hair with a slight wave, composed expression that softens when he's caught off guard, the same navy school uniform with a worn paperback always in the breast pocket. Both are built as saved characters in AutoWeeb's character sheet builder before any scene is generated.
Locations and Props
Three locations: a sunlit classroom in late afternoon light, a rooftop overlooking a low-rise urban neighborhood, and a wide school hallway with bulletin boards along one side. The letter is the only significant prop: a single folded page with handwritten text, saved as a reference note in the project.
Script Writing and Storyboarding
The script is written scene by scene in AutoWeeb. Each scene gets an action line, the key lines of dialogue, and a note on the emotional state at the start and end. The storyboard follows directly: establishing shot for each location, close-ups for reaction moments, a sustained medium shot for the hallway conversation's emotional hold, and a final wide shot that pulls back as Hana and Kenji walk in the same direction for the first time.
Image Generation, Video, and Editing
With both characters tagged from the saved library, image generation for the 24-panel storyboard takes one session. Location reference images are generated first. Scene panels follow in order. Three panels are regenerated: one where Hana's expression reads as annoyed rather than nervous, one where Kenji's outfit lost the pocket book, one where the rooftop background drifted from the established reference. The approved panels go to AutoWeeb's video pipeline for the rooftop and hallway scenes. Dialogue scenes use image sequences with voice-over. The final cut is assembled, music added, and the episode is exported.
Total pre-production time invested: roughly four hours across all ten phases. Total generation sessions: three. Total regeneration passes: four panels. The result is a consistent, coherent short with characters who look the same from the first scene to the last, because the pre-production made that consistency possible before a single image was generated.
For a deeper look at the full AutoWeeb pipeline from script to video, the post on why AutoWeeb is the best AI anime pre-production studio covers each stage with additional context on how the workspace connects them.
Frequently Asked Questions
Do I really need to complete every phase before starting image generation?
Not every project needs every item on every checklist. But the phases that matter most for consistency are 2, 3, and 7: character design, character sheets, and storyboarding. Skipping any of those three creates problems that are expensive to fix after generation has started. The other phases reduce iteration time and improve storytelling quality, but their absence is more recoverable.
How long does pre-production take for a short AI anime episode?
For a 3-to-5 minute episode with two or three characters and two or three locations, a beginner working through this checklist methodically should expect 3 to 6 hours of pre-production. That investment typically reduces generation time by more than it adds, because most of the iteration that happens without pre-production is spent recovering decisions that were never made.
What is the most common pre-production mistake AI anime creators make?
Skipping character sheets and going directly to scene generation. The result is a protagonist who looks visually inconsistent across panels, which makes the storyboard unusable as a production document. The fix always involves going back to build the character sheet that should have been built first, and then regenerating every panel where the character drifted.
Can AutoWeeb handle all ten phases of this checklist?
Yes. AutoWeeb's workspace covers script writing, character creation and character sheets, location and prop reference, storyboarding with character tagging, image generation, and image-to-video pipeline, all in one place. The phases in this checklist map directly to features in AutoWeeb, which is what makes the workflow coherent rather than a patchwork of different tools.
How does a storyboard checklist improve AI video generation quality?
Video generation quality is directly tied to the quality of the input image and the precision of the motion description. A storyboard panel that was generated with a clear framing intent and a noted camera movement direction produces better video output than a static image without context. The storyboard checklist forces those decisions to be made at the right stage, which is before image generation, not after.
Is this checklist useful for manga-to-anime adaptations as well as original stories?
Yes, with modifications. For manga adaptations, phases 1, 2, and 3 are shorter because many creative decisions are already made. The story concept, character designs, and locations are defined by the source material. The adaptation work happens in phase 7 (storyboarding), where manga panels are translated into animation-ready shot lists. The guide on turning manga panels into an AI anime storyboard in minutes covers that specific workflow.
How do I know when pre-production is done and it's safe to start generating?
Pre-production is done when you can describe any scene in your project in a single, specific paragraph without needing to make new decisions. If you open a blank storyboard panel and have to figure out what your character looks like, where the scene takes place, or what the emotional purpose of the shot is, pre-production is not done. When those answers already exist in your project documents, you are ready to generate.
For more on building production-quality anime characters before storyboarding, the post on how AutoWeeb's AI agent helps you create better original anime characters walks through the character development process that makes every other phase of production faster.
Related Blog Posts
AutoWeeb vs ChatGPT Image: Which AI Tool Is Better for Creating Consistent Anime Characters and Stories?
ChatGPT Image generates impressive one-off anime art. AutoWeeb is built for anime creators who need the same character to look right across every scene, storyboard panel, and video clip.
AutoWeeb vs ChatGPT Image for anime creation in 2026. Compare character consistency, storyboarding, anime styles, video generation, and which platform is right for your creative workflow.
AutoWeeb vs Gemini: The Better AI Platform for Anime Images, Characters, and Videos
Gemini generates impressive images across many styles. AutoWeeb is built to produce the same anime character, consistently, across every image, storyboard panel, and animated video clip you need.
AutoWeeb vs Gemini for anime creation: compare image generation, character sheets, storyboarding, and video. Find out which AI platform is better for anime creators in 2026.
AutoWeeb vs Midjourney: Which AI Tool Is Better for Anime Storytelling and Character Consistency?
Midjourney generates some of the most visually stunning AI images available. AutoWeeb is built to take a specific anime character through an entire story, consistently, without rebuilding them from scratch every session.
AutoWeeb vs Midjourney for anime storytelling: compare character consistency, storyboards, image-to-video, and anime-specific workflows. Find the best AI tool for anime creators in 2026.

AutoWeeb vs Niji Journey: Which Anime AI Generator Is Best for Building Characters and Stories?
Niji Journey produces genuinely impressive anime artwork. AutoWeeb is built to take that character through an entire story, scene by scene, with the same face and outfit every time.
AutoWeeb vs Niji Journey for anime character creation and storytelling: compare consistency, storyboarding, image-to-video, and full creative workflows. Best anime AI generator in 2026.
Explore AutoWeeb
Jump into the tool that fits your creative step.
AI Anime Video Generator
Animate storyboard shots into cinematic clips with Seedance 2 and consistent characters.
Anime Character Creator
Design original characters with consistent sheets across every scene.
AI Anime Image Generator
Generate cinematic anime stills anchored to your character library.
Turn Photo Into Anime
Upload any photo and watch AI turn it into stunning anime art in seconds.
AI Anime Location Generator
Create a location set once, then generate reference images from every angle.
AI Anime Storyboarding
Describe your idea, pick your characters, and let AI draft the script and scenes.
AI Anime Prompt Agent
Turn a rough idea into a cinematic Seedance 2 prompt with the AI Director.